Concertina Bauplan/en: Unterschied zwischen den Versionen
(translation preparation) |
(→Weiterführende Links: translation) |
||
| (5 dazwischenliegende Versionen desselben Benutzers werden nicht angezeigt) | |||
| Zeile 1: | Zeile 1: | ||
Concertina Construction plan | Concertina Construction plan | ||
| + | |||
The structure of [[Concertina|Oskar Concertina]] essentially consists of a microcontroller (ESP32) and 8 keys. | The structure of [[Concertina|Oskar Concertina]] essentially consists of a microcontroller (ESP32) and 8 keys. | ||
The replica is beginner friendly. You only have to solder (leaded) components with through-hole plating. | The replica is beginner friendly. You only have to solder (leaded) components with through-hole plating. | ||
| Zeile 25: | Zeile 26: | ||
[[Datei:Werkzeug.jpg|center|600px|Werkzeug: Screwdriver, hexagon socket wrench, soldering tin, side cutter, soldering iron, optional soldering grease and third hand with magnifier | [[Datei:Werkzeug.jpg|center|600px|Werkzeug: Screwdriver, hexagon socket wrench, soldering tin, side cutter, soldering iron, optional soldering grease and third hand with magnifier | ||
]] | ]] | ||
| − | * | + | * software |
** [https://github.com/espressif/esp-idf Espressif IoT Development Framework ] | ** [https://github.com/espressif/esp-idf Espressif IoT Development Framework ] | ||
** [https://gitlab.com/teamoskar/oskar_esp32 Oskar Concertina Firmware (Oskar ESP32)] | ** [https://gitlab.com/teamoskar/oskar_esp32 Oskar Concertina Firmware (Oskar ESP32)] | ||
== Electronics soldering == | == Electronics soldering == | ||
| − | # | + | # First solder only the components above the microcontroller board Wemos LolinD32. Solder the resistor and only the 4 keys above the LolinD32. Attention! The solder joints of these components are then covered by the LolinD32 and can no longer be soldered after soldering the LolinD32! The 4 keys next to the LolinD32 must not be soldered to leave space for soldering the LolinD32! |
| − | # | + | [[Datei:Platine oben.jpg|center|600px|board top, 4 keys and resistor are soldered in front of the LolinD32]] |
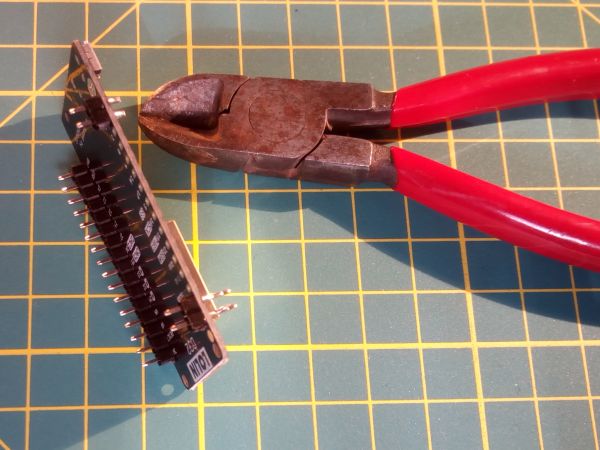
| − | # | + | # Now you can solder on LolinD32. The pin headers come between the PCB and the LolinD32 with the long pins pointing down towards the LolinD32. Solder the LolinD32 pins BAT, 13, 12, 14, 27, 26, 25, 33, 32 as well as the two GND and their adjacent pins. [[Datei:Stiftleiste.jpg|center|600px|2 Pin connectors are shortened with the side cutter]] |
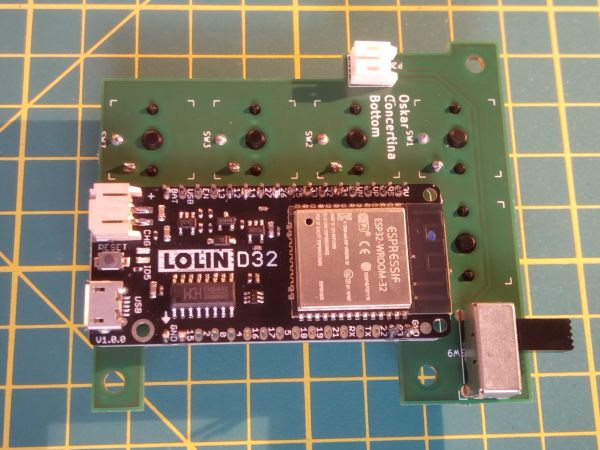
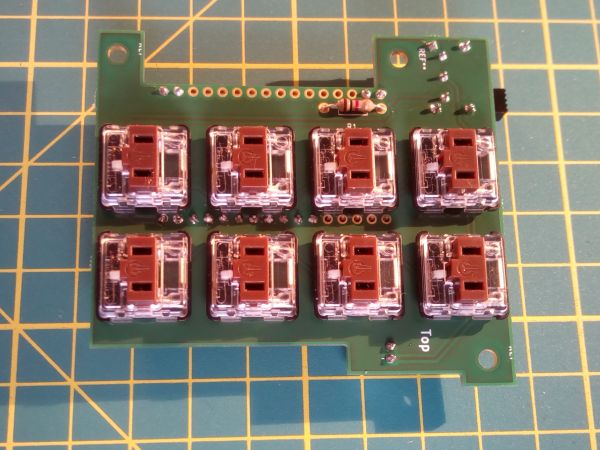
| + | # Then solder the remaining components (LiPo plug, on/off switch and 4 keys), and you can switch from the soldering station to the computer. [[Datei:Platine_unten_voll.jpg|center|600px|Board underside with LolinD32, LiPo plug and on/off switch]] [[Datei:Platine oben 8tasten.jpg|center|600px|board top with 8 keys]] | ||
| − | == | + | == Flash firmware == |
| − | + | If you haven't installed the "Espressif IoT Development Framework" yet, follow the installation instructions of Espressif. | |
| − | + | Download the source code of the [https://gitlab.com/teamoskar/oskar_esp32 Oskar ESP32 Firmware]! There you will find a download button or the necessary git commands. | |
| − | + | Establish the USB cable connection between your computer and Oskar Concertina! | |
| − | + | Change to the downloaded (and if necessary unpacked) directory and flash the Oskar Concertina ESP32 firmware to the microcontroller with the command "make flash". | |
| − | + | Test with "make monitor" if all keys deliver signals. Each release of a key is displayed as a bit of one byte on the monitor! | |
| − | + | Establish a Bluetooth connection with your smartphone (or other Bluetooth enabled device that accepts Bluetooth HID keyboards)! | |
| − | Oskar Concertina | + | Oskar Concertina can only pair with a new device for a limited time (30 seconds) after switching on. |
| − | + | If it doesn't work immediately, disconnect Oskar Concertina from the power supply (via USB cable or LiPo battery) and repeat the pairing process within 30 seconds. | |
| − | + | The connection to the LiPo battery is established via the on/off switch (switch on the inner position) or interrupted (switch on the outer position). | |
| − | == | + | == Installation == |
| − | + | Deburr the fresh 3D print if necessary! The screws and magnets must fit easily through the holes provided. I can recommend a carpet knife and a metal file. | |
| − | + | Screw the threaded inserts into the holes provided in the cover. [[Datei:Gewindeeinsatz.jpg|center|600px|Cover with threaded inserts]] Positioniere die Platine auf dem Deckel! | |
| − | + | Position the board on the lid! | |
| − | + | Place the LiPo battery protection on the key soldering points next to the LolinD32 and connect the LiPo battery to the PCB! Screw the magnets onto the two long screw sockets! | |
| + | Screwing the magnets onto the two long screw sockets is a bit of a game of skill, because the strong magnets make unforeseen movements when screwing. [[Datei:Deckel platine magnete.jpg|center|600px|Cover with platine, LiPo battery, LiPo protection and magnets]] | ||
| − | + | Position the base plate and make sure that the LiPo battery lies on the LiPo battery protector and that you do not pinch the cable of the LiPo battery! Then you can tighten the base plate. | |
| − | + | Do not overtighten the screws. [[Datei:Boden.jpg|center|600px|Oskar Concertina Rear and Hex Key]] | |
| − | [[Datei:Oskar concertina innensechskant.jpg|center|600px|Oskar Concertina | + | [[Datei:Oskar concertina innensechskant.jpg|center|600px|Oskar Concertina and hexagon socket wrench]] |
| − | == | + | == Application == |
| − | + | To quickly attach and detach Oskar Concertina to the back of your phone, place two thin metal plates in place of the magnets between the case and the phone. You can do this easily by placing Oskar Concertina with the magnets up and the smartphone case on top. If you now place the metal plates in the smartphone case, they will find their place magnetically. [[Datei:Smartphone oskar concertina.jpg|center|599px|Oskar Concertina on Smartphone]] But the small keyboard is not only useful on the back of smartphones, Oskar Concertina also offers interesting possibilities as a remote control for smartphones, computers or TVs. LiPo battery can be charged via USB cable when the on/off switch is "On" (switch on the inner position). | |
| − | [[Datei:Braille-basissystem.png|center|800px|Braille | + | [[Datei:Braille-basissystem.png|center|800px|Braille Basic System of the German Braille]] |
| − | + | If you have not yet mastered Braille, now is the best time to learn Braille. If you're not in the mood for Braille, you can design your own keyboard layout for the 8 keys. To do this, change the entries in the table "chord_id_keycode" to oskar_esp32/main/main.c. Or you can develop a Shift mode based on the Arrow or WASD mode (arrow_modus, wasd_modus). | |
| − | + | Have fun pressing the buttons. | |
| − | == | + | == Related Links == |
| − | * [https://gitlab.com/teamoskar/oskar_concertina | + | * [https://gitlab.com/teamoskar/oskar_concertina Projekt Archiv Oskar Concertina] |
* [https://oskar.ddns.mobi/ Website Oskar] | * [https://oskar.ddns.mobi/ Website Oskar] | ||
* [https://gitlab.com/teamoskar/oskar_esp32/blob/master/brailletable.txt Erich Schmids 8 Keys Braille] | * [https://gitlab.com/teamoskar/oskar_esp32/blob/master/brailletable.txt Erich Schmids 8 Keys Braille] | ||
| − | * Smartphone | + | * Smartphone and Oskar Concertina Video |
<html5media height="360" width="640">https://www.youtube.com/watch?v=q0peQTYuEqs</html5media> | <html5media height="360" width="640">https://www.youtube.com/watch?v=q0peQTYuEqs</html5media> | ||
Aktuelle Version vom 29. September 2019, 21:51 Uhr
Concertina Construction plan
The structure of Oskar Concertina essentially consists of a microcontroller (ESP32) and 8 keys. The replica is beginner friendly. You only have to solder (leaded) components with through-hole plating. You can have the board made by a board manufacturer. The 3D printing of the case, with 0.4 mm nozzle diameter of a Kossel 3D printer, takes about 4 hours with activated support structures. The assembly takes about 1 hour. The material costs amount to approx. € 50.

Inhaltsverzeichnis
Preparation
To build Oskar Concertina you need material, tools and software.
- material bill of material

- tools tools list
- 3D printer
- Soldering iron and optional third hand with magnifying glass
- side cutter
- flat screwdriver 4.5 to 5 mm wide
- Hexagon socket wrench 2 mm
- Carpet knife and metal file

Electronics soldering
- First solder only the components above the microcontroller board Wemos LolinD32. Solder the resistor and only the 4 keys above the LolinD32. Attention! The solder joints of these components are then covered by the LolinD32 and can no longer be soldered after soldering the LolinD32! The 4 keys next to the LolinD32 must not be soldered to leave space for soldering the LolinD32!

- Now you can solder on LolinD32. The pin headers come between the PCB and the LolinD32 with the long pins pointing down towards the LolinD32. Solder the LolinD32 pins BAT, 13, 12, 14, 27, 26, 25, 33, 32 as well as the two GND and their adjacent pins.
- Then solder the remaining components (LiPo plug, on/off switch and 4 keys), and you can switch from the soldering station to the computer.


Flash firmware
If you haven't installed the "Espressif IoT Development Framework" yet, follow the installation instructions of Espressif.
Download the source code of the Oskar ESP32 Firmware! There you will find a download button or the necessary git commands. Establish the USB cable connection between your computer and Oskar Concertina!
Change to the downloaded (and if necessary unpacked) directory and flash the Oskar Concertina ESP32 firmware to the microcontroller with the command "make flash". Test with "make monitor" if all keys deliver signals. Each release of a key is displayed as a bit of one byte on the monitor!
Establish a Bluetooth connection with your smartphone (or other Bluetooth enabled device that accepts Bluetooth HID keyboards)! Oskar Concertina can only pair with a new device for a limited time (30 seconds) after switching on. If it doesn't work immediately, disconnect Oskar Concertina from the power supply (via USB cable or LiPo battery) and repeat the pairing process within 30 seconds. The connection to the LiPo battery is established via the on/off switch (switch on the inner position) or interrupted (switch on the outer position).
Installation
Deburr the fresh 3D print if necessary! The screws and magnets must fit easily through the holes provided. I can recommend a carpet knife and a metal file.
Screw the threaded inserts into the holes provided in the cover.

Positioniere die Platine auf dem Deckel!
Position the board on the lid! Place the LiPo battery protection on the key soldering points next to the LolinD32 and connect the LiPo battery to the PCB! Screw the magnets onto the two long screw sockets!
Screwing the magnets onto the two long screw sockets is a bit of a game of skill, because the strong magnets make unforeseen movements when screwing.

Position the base plate and make sure that the LiPo battery lies on the LiPo battery protector and that you do not pinch the cable of the LiPo battery! Then you can tighten the base plate.
Do not overtighten the screws.


Application
To quickly attach and detach Oskar Concertina to the back of your phone, place two thin metal plates in place of the magnets between the case and the phone. You can do this easily by placing Oskar Concertina with the magnets up and the smartphone case on top. If you now place the metal plates in the smartphone case, they will find their place magnetically.

But the small keyboard is not only useful on the back of smartphones, Oskar Concertina also offers interesting possibilities as a remote control for smartphones, computers or TVs. LiPo battery can be charged via USB cable when the on/off switch is "On" (switch on the inner position).

If you have not yet mastered Braille, now is the best time to learn Braille. If you're not in the mood for Braille, you can design your own keyboard layout for the 8 keys. To do this, change the entries in the table "chord_id_keycode" to oskar_esp32/main/main.c. Or you can develop a Shift mode based on the Arrow or WASD mode (arrow_modus, wasd_modus).
Have fun pressing the buttons.
Related Links
- Projekt Archiv Oskar Concertina
- Website Oskar
- Erich Schmids 8 Keys Braille
- Smartphone and Oskar Concertina Video
<html5media height="360" width="640">https://www.youtube.com/watch?v=q0peQTYuEqs</html5media>